

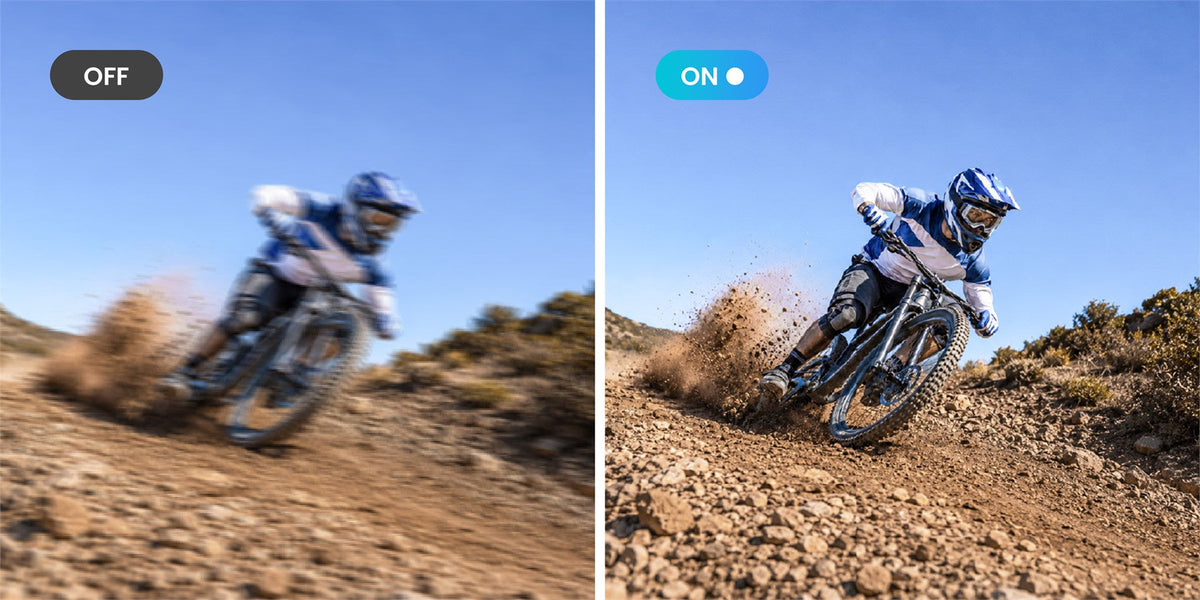
Action camera image stabilization can make running, riding, and handheld footage easier to watch. It also changes the image. Electronic stabilization needs room to move the frame, and stronger horizon correction may restrict resolution, frame rate, aspect ratio, or low-light modes.
The right setting depends on the motion, mount, light, and finished frame. This guide explains what stabilization can correct, what it cannot correct, and how to test a mode before an important shoot.
How Electronic Stabilization Works
An action camera measures movement and adjusts the visible frame to counter it. The camera keeps a margin around the image so it can shift or rotate the crop while the body moves.
That process creates two practical effects. First, the stabilized field of view is usually narrower than the unstabilized view. Second, the correction needs enough image area and processing headroom, so some combinations of resolution, frame rate, aspect ratio, or lens mode may be unavailable.
Horizon leveling adds rotation correction. A basic mode may correct small tilts, while a full horizon lock tries to keep the horizon level through much larger camera rotation. Stronger correction usually requires a larger crop or a more limited recording mode.
Stabilization Does Not Replace a Secure Mount
Electronic correction can smooth ordinary steps, trail movement, and small bumps. It cannot reliably repair a clamp that slips, a long arm that flexes, or a camera that strikes another object.
Start with the mount:
- Use the shortest extension that produces the required view.
- Tighten each connection to the manufacturer's guidance.
- Keep heavy adapters close to the mounting point.
- Check that straps, clothing, cables, and accessories cannot hit the camera.
- Add appropriate secondary retention in high-consequence locations.
Record a short test on the real surface. Walking across a room does not reproduce handlebar vibration, a ski edge, or rough trail impacts.
Expect Some Cropping
Compare modes by the frame they deliver, not only by the stabilization label. A wide lens mode may become noticeably tighter after horizon correction.
Cropping matters when the camera is close to a face, mounted low on a vehicle, or expected to show both the subject and surrounding terrain. It also matters when the footage will be cropped again for vertical social video.
Before the main shoot, place recognizable objects near all four edges of the frame. Record the same movement with the intended modes, then compare how much of the scene remains. Repeat the check in the final 16:9 or 9:16 export.
Match the Mode to the Movement
Use ordinary electronic stabilization for movement that changes direction without rolling the camera completely. It is a practical choice for walking, running, chest mounts, and many bicycle or motorcycle positions.
Use tilt correction when the mount may lean but the horizon should stay visually calm. This can help on turns and uneven terrain, provided the supported resolution and aspect ratio match the project.
Use full horizon lock only when large camera rotation is likely and a level horizon is essential. The stronger correction may reduce available resolution or field of view. It can also make intentional banking feel disconnected from the rider or vehicle, so compare the storytelling effect rather than assuming level is always better.
Turn stabilization down or off for a locked-off tripod shot when no correction is needed. This preserves the widest available view and avoids unnecessary frame movement caused by the system searching for motion.
Frame Rate Changes the Result
Frame rate controls how often the camera records an image. It does not directly measure stabilization strength, but it changes motion rendering and exposure.
Thirty frames per second is a useful starting point for general outdoor video. Sixty frames per second can show fast movement more clearly and supports moderate slow motion when there is enough light. Higher frame rates give each frame less time to collect light, which can increase noise or force other exposure compromises.
Test the full mode combination. A camera may offer a resolution and a stabilization feature separately without supporting both together at every frame rate.
Why Low Light Can Still Look Blurry
Stabilization moves the frame after motion has been measured. It cannot restore detail that blurred during the exposure.
In low light, the camera may use a longer shutter time. The stabilized horizon can look level while road markings, leaves, faces, or lights smear inside each frame. Strong digital correction may also crop into a noisier part of the image or make edge warping more noticeable.
Improve the result in this order:
1. Secure the mount and clean the lens protector.
2. Add light or move the subject into better illumination when possible.
3. Reduce unnecessary camera movement.
4. Compare 30 fps with 60 fps under the same light.
5. Use only the stabilization mode supported by the selected low-light setting.
6. Review moving footage at normal speed, then pause frames to inspect blur.
For a deeper explanation of shutter, noise, and night modes, use the low-light action camera guide.
How XTRA Edge Pro Handles Stabilization Choices
XTRA Edge Pro uses MotionMaster electronic image stabilization for handheld and mounted action. It also provides two horizon-control options with documented mode limits.
- TiltGuard supports 1080p, 2.7K, and 4K at up to 60 fps in 16:9.
- 360 Lock supports 1080p and 2.7K at up to 60 fps in 16:9.
- Night View does not support TiltGuard or 360 Lock.
XTRA Edge Pro is an XTRA product. This article uses manufacturer specifications and current store listings and does not present an independent laboratory test.
The mode list shows why a single strongest-setting recommendation would be misleading. A creator who needs a 4K level horizon can start with TiltGuard. A rider expecting full camera rotation may prefer 360 Lock and accept its resolution limit. A night shoot requires a separate decision because Night View excludes both horizon modes.
These are compatibility facts, not proof that one mode will outperform another on every route. Mount rigidity, movement, light, field of view, and final export determine which result is most useful.
Run a Repeatable Stabilization Test
Use a short route that includes the movement the project will contain. Keep the camera position and route consistent, then record one clip per mode.
Log the following details:
- Camera position and mount hardware
- Resolution, frame rate, aspect ratio, and field of view
- Stabilization or horizon setting
- Lighting and approximate time
- Walking, riding, or vehicle speed
- Any crop added during editing
Review the full clips on the same screen. Look for horizon movement, edge warping, micro-jitters, motion blur, and how much of the original frame remains. Do not base the decision on a single paused frame because stabilization is a motion result.
Choose the Setting From the Finished Shot
Use a stronger mode when large rotation or rough movement would otherwise distract the viewer. Use a lighter mode when field of view and maximum resolution matter more. Fix the mount before asking software to hide vibration, and treat low-light blur as an exposure problem as well as a stabilization problem.
For broader camera and mount criteria, see the action camera buying guide. To confirm current Edge Pro mode limits and product specifications, visit the official XTRA Edge Pro product page.

Leave a comment
This site is protected by hCaptcha and the hCaptcha Privacy Policy and Terms of Service apply.