

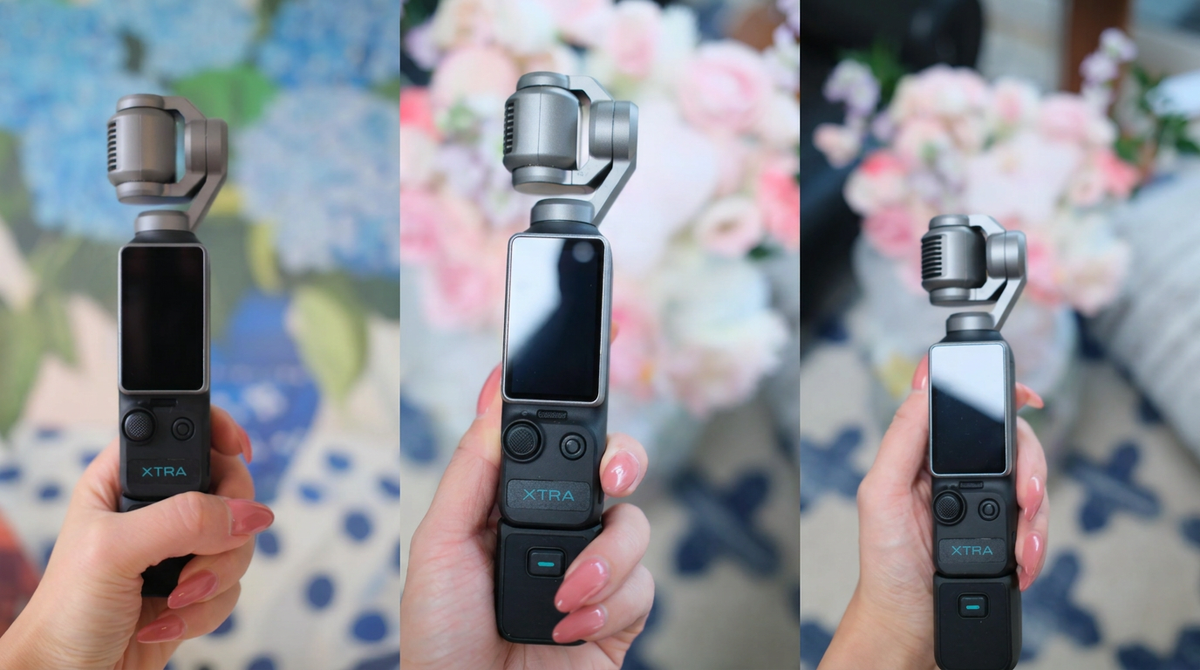
Making a YouTube video and a Reel from the same outing starts before you press Record. Decide which moments need a wide frame, which need a vertical frame, and which are worth recording twice. That small amount of planning can save you from cropping someone out of an otherwise useful clip.
With XTRA Muse, choose your recording orientation before starting the take. The camera's FAQ describes Landscape, Portrait, and Auto-Rotation settings, and says the orientation stays locked once recording begins. To change direction, stop, reframe, and start a new clip. Muse product FAQ
Here is a workflow for recording, moving your files, and building both edits without relying on a particular app's menus.
Plan two frames before you shoot
Use a horizontal 16:9 edit for your main YouTube video and a vertical 9:16 edit for a Reel or Short. These are editing targets, not a promise about every recording mode's native dimensions.
| Moment | Horizontal version | Vertical version |
|---|---|---|
| An introduction | Include the location around you | Keep your face and gestures comfortably inside the frame |
| A demonstration | Show the whole working area | Move closer to the important action |
| A detail | Hold the shot long enough to establish context | Record a separate, tighter composition |
| A closing thought | Leave room for a concluding shot | Give the short version its own ending |
If you must use one horizontal clip for both edits, keep the essential action near the center and leave room around it. Check a vertical crop before recording a long sequence. A wide composition with two people far apart may need a separate vertical take.
Set the orientation, then check the recording mode
Frame your shot in Landscape or Portrait, or use Auto-Rotation as described in the FAQ. Before recording, check the displayed orientation and the selected video settings. After changing direction, check them again.
To change modes, tap the mode icon at the lower left of the preview, swipe left or right to choose, then swipe up to return. Swipe up from the bottom of the preview to adjust the current mode's basic recording parameters. Muse mode controls
Record a short sample and play it back. Look at whether the person or object fits the frame and whether the clip has the expected shape. Later, inspect the file's dimensions on your phone or computer. A rotating screen and a “4K” label do not, by themselves, establish the pixel dimensions of a portrait file.
Keep normal video and slow motion separate
Muse's store FAQ lists normal video up to 4K at 60 fps and slow motion up to 4K at 120 fps. Use normal video for dialogue that should play at its recorded speed. Choose slow motion deliberately for a movement or detail you want to slow down. The two maximums describe different modes. Muse recording specifications
Pick a frame rate that works with the edit you intend to make, then keep ordinary dialogue clips consistent. Do not select the highest available setting simply because it is there; consider storage, lighting, and your editing workflow too.
Check focus, tracking, and sound together
Before a talking clip, record a sentence while moving as you expect to move in the finished take. Review your framing and listen to the sound. For a demonstration, move the object through the area where you plan to hold it and check that the important detail stays clear.
Autofocus and subject tracking do different jobs: one keeps the subject sharp; the other helps follow its position. Do not judge focus only by seeing the camera turn toward you.
The manual describes subject tracking in Photo or Video mode and lists Low-Light separately. Do not assume that selecting Low-Light preserves the same tracking options. Check the available functions after a mode change. Muse user manual
Start with a short recording using the audio setup you will actually carry. If you use an external microphone, confirm its exact connection and make a playback check before leaving. A connector fitting the camera is not enough to confirm that the intended microphone is being recorded.
For slow motion, keep the accompanying files together: the manual says sound is saved separately in the same directory. Check those files when you import the clip, especially if you want to use the original sound in your edit. Audio and slow-motion instructions
Move the originals before you start editing
On your phone: enable Wi-Fi and Bluetooth, open the Xtra App, and tap the camera icon on its home screen. Follow the connection prompts. Once connected, use the playback icon to preview recordings and the download icon to copy them to your phone.
On your computer: turn Muse on, connect it by USB, and choose the file-transfer option in the camera's pop-up. The camera cannot take photos or record video while transferring files. This is the file-copying route, separate from its webcam function. Connection and file-transfer instructions
After transferring, open a video and check both picture and sound. Keep the original recordings in a clearly named folder, together with any separate audio files. Make a second copy before deleting or formatting the card.
Name your projects by shoot and format—for example, “Weekend Walk — YouTube” and “Weekend Walk — Reel.” You can use the same source folder while keeping the two edits separate.
Build the horizontal edit, then reframe the vertical version
Start with the story: an introduction, useful action or explanation, and an ending. Remove mistakes and pauses before adding transitions or effects.
For the vertical edit, choose the moments that make sense on their own. Reframe each shot rather than applying one crop to the entire sequence. Watch for hands, products, and faces moving out of view. Place captions where they remain readable without covering the action, and inspect the final frame at phone size.
If a horizontal clip cannot survive the crop, use the separately recorded portrait take. Enlarging a cropped image does not restore detail that was outside the crop.
Choose a color workflow you can finish
A standard-color workflow is a practical starting point when you want to edit and share without a separate grading step. Keep the appearance consistent between adjacent shots instead of adding a different look to every clip.
Muse also offers 10-bit X-Log, and XTRA provides an X-Log-to-Rec.709 LUT. If you choose that route, use an editor that supports your files and follow the color workflow appropriate to the project. Keep the original and work on a copy; a LUT does not replace checking exposure, white balance, and the final image.
Inspect both exports before posting
Export the horizontal and vertical edits separately. Confirm the aspect ratio, chosen frame rate, sound, and file orientation in each exported file—not just in the editing preview.
Watch both from beginning to end. Look for black borders, cropped captions, missing sound, abrupt audio changes, and a final shot that cuts off too early. Avoid repeatedly exporting and reimporting compressed copies; keep your original project and source files for revisions.
This approach suits creators who can plan separate takes for each format. If you need to change orientation during one uninterrupted recording, plan a different capture approach. For outdoor shoots, remember that Muse is not waterproof: keep it away from rain and water. Muse use limitations
Quick questions
Can I switch between horizontal and vertical during a clip?
No. The current Muse FAQ says the orientation is locked after recording starts. Stop recording before changing direction.
Does Portrait mode always mean native 4K?
Do not assume that. The cited product information does not provide a complete portrait resolution and frame-rate table. If you need a specific output, confirm the available camera setting and the original file's dimensions before an important shoot—or before buying for that requirement.
Do I need X-Log for Reels?
No. Choose it when you want a grading workflow. A standard-color edit can be the more straightforward route when your priority is finishing and sharing the video.
Before your next outing, record one horizontal clip and one vertical clip, transfer them, and finish a short edit of each. For the equipment side, use the Muse starter-kit budget guide. If you are still deciding whether to add a camera, start with the Muse and phone comparison guide.


Leave a comment
This site is protected by hCaptcha and the hCaptcha Privacy Policy and Terms of Service apply.